Table of Contents:
Method 1 - Launching from the Desktop:
Double-click the HeavyBid Standalone or HeavyBid Workstation (multi-user) desktop icon to launch the program.
Windows 7 and Older:
- Click Start (Windows icon in the bottom left corner).
- Navigate to Programs (or All Programs) > HCSS > HeavyBid.
Windows 8 and 10:
- Click Start (Windows icon in the bottom left corner) and type HeavyBid into the search bar.
- Click on the appropriate version of HeavyBid returned in the search results.
HeavyBid Welcome Screen:
Each time HeavyBid is launched, the welcome screen is displayed to provide quick access to working estimates, new estimate creation, and important updates.
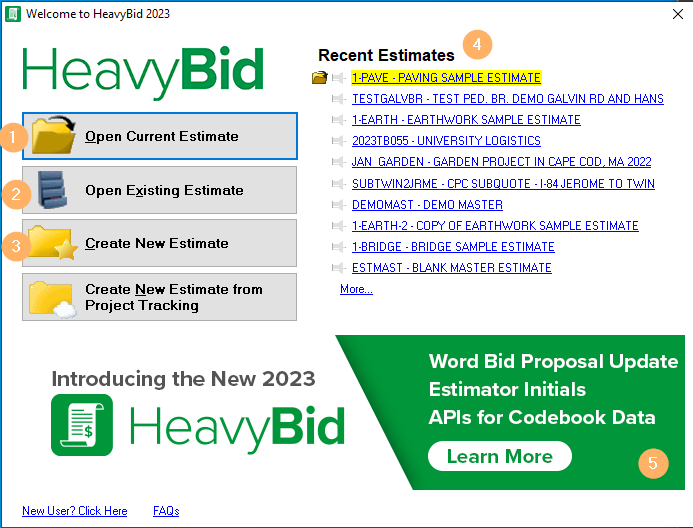
- Open Current Estimate – Opens the last used estimate, which is also highlighted in yellow under Recent Estimates.
- Open Existing Estimate – Opens the entire estimate list. This is the same as going to File > Open.
- Create New Estimate – Opens the estimate creation wizard. This is the same as going to File > New > New Estimate.
- Recent Estimates – Displays the last 10 estimates opened in HeavyBid.
- This section is used for HCSS to send important messages to customers. Messages may include:
- Information concerning the availability of a newer version of HeavyBid.
- HCSS Events (trainings, user group meetings, etc.)
- Important notifications and updates.
Main Menu (Ribbon) Bar:
The menu bar is used to access the main HeavyBid window and associated features. Is is located at the top of the HeavyBid window.
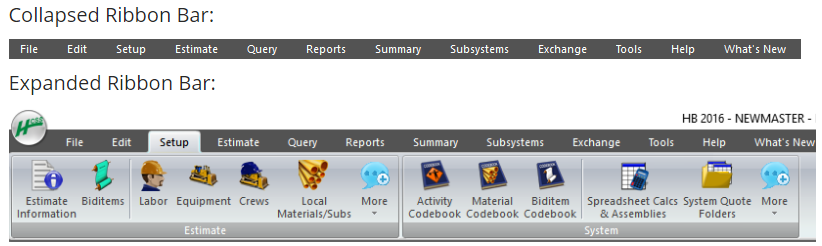
The menu bar expands when a section header (File, Edit, Setup, etc.) is clicked on. By default, it collapses, once a sub-item is selected and opens. To leave the menu bar expanded by default, double-click any of the section headers (File, Edit, Setup, etc.).
Right-Click Menus:
Right-click menus are available in many grids and trees within HeavyBid. To access a right-click menu, right-click on a record or item. A menu pops up at the location of the cursor, providing a list of functions which can be performed for the specific item.
HeavyBid Toolbar:
The toolbar displays buttons for the most commonly-accessed features of HeavyBid. Hover the mouse pointer over a button on the toolbar to display a tooltip (a short pop-up text) that describes the button. For information about specific toolbar buttons, refer to https://help.hcss.com.

Estimate Entry Toolbar:
The Estimate Entry toolbar is located along the right edge of all estimate entry screens and displays quick access to various estimate entry/review tools. Like the main toolbar, hovering the mouse pointer over a button on the toolbar to display a tooltip (a short pop-up text) that describes the button.
Tree Views:
Tree views are multi-level lists. Data is grouped under headings which can be expanded or collapsed, with each sub-level providing more specific detail.
The tree can be navigated using the + and - icons beside each level (or branch). Click the + icon to expand a section; click the - icon to collapse a section. To select an item, check the check-box beside the desired item. Typically, only items at the lowest level of a branch will be selected.
Grids and Spreadsheet Views:
Grids (sometimes called spreadsheets) are common in HeavyBid.
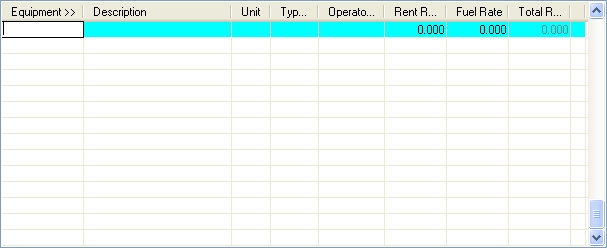
Each row in the grid represents one item of a type. For example, on the Equipment Setup window, each row in the grid is one piece of equipment. When the cursor is in the grid, the active row is highlighted for visual reference.
Press the Tab or Enter key to move to the next field in the row. Upon reaching the end of the row, the Tab or Enter key moves to the first field in the next row. Press the Up Arrow and Down Arrow keys to move through rows in the grid.
Pop-Up Windows:
Pop-up windows are available from many fields within HeavyBid. These pop-up windows enable various functions including: selecting dates, entering notes, or selecting items from a list.
For form fields, a  button within or next to a field indicates a pop-up window. Within grids, a column heading title followed by >> indicates a pop-up window. Click the column heading to display the pop-up window.
About Saving Records:
In general, information in HeavyBid is automatically saved as it is entered in a row by row or section by section basis. This means that as a row or a section of information is completed, the information is saved. While the row or section being added or edited is being worked on, the information is not currently saved. This is displayed by a red stop sign icon  towards the top right of the window.
Example: When entering information into a grid, the information in the current row being created/edited is not saved until moving off of the row. While typing in the row, the stop sign icon displays in the window title bar. Once moving off of the row, the information entered is automatically saved and the stop sign icon disappears.
Information can also be saved at any time by performing any of the following:
- Move the cursor to a different row or section.
- Press F2 (save).
- Press Ctrl+S (save current record).
- Click the save button (disk icon) in the HeavyBid toolbar.
Keyboard shortcuts are available on most windows within HeavyBid.
If enabled within Windows settings, buttons, tabs, and other selection items labeled with an underlined letter can be used by pressing the Alt key and the underlined letter. Example:
| To use a button labeled: | OK |
| Press : | Alt+K |
Some standard keyboard shortcuts that apply throughout HeavyBid include:
| Tab | Move to the next field |
| Shift + Tab | Move to the previous field |
| Enter | Move to the next field. If a button is highlighted, it clicks the button. |
| Esc | Exit current screen |
| Page Up | Scan table backward |
| Page Down | Scan table forward |
| Up Arrow | Move up one line |
| Down Arrow | Move down one line |
| Alt + W | Toggle Unreviewed status of activity from the Estimate Entry - Tree View. |
| F1 | Help |
| F2 | Save |
| F4 | Selection Lists when applicable |
| F5 | Blanks out the screen fields |
| F6 | Jumps the cursor |
| F7 | Finds the previous record |
| F8 | Finds the next record |
| Shift + F2 | Delete the current row or line item |
Resource Codes:
Estimates in HeavyBid are built up by using resource codes to represent items that make up a bid, such as labor, equipment, and materials. Resource codes are user-defined and can be set up prior to estimate creation or, in some cases, created within an estimate as needed.
An important feature of Resource Codes is that their first character determines the kind or type of resource they are. HeavyBid uses the following conventions to identify default resources types:
| Resource Type | First Character | Resource Code Example |
|---|
| Labor | A-Z | LABORER |
| Permanent Material | 2 | 2BRICK |
| Construction Material | 3 | 3WOOD |
| Subcontractors | 4 | 4GRASS |
| Equipment | 8 | 8DOZER |
Organizing Resource Codes:
Resource codes are organized and sorted alphanumerically. With this in mind, codes can be structured so that resources appear in convenient groups for selection menus and reports.
For example, all equipment operators can be displayed together by using the letter “O” for Operator at the beginning.
| OE | Excavator Operator |
| OD | Dozer Operator |
| OS | Scraper Operator |
This same concept applies to equipment and materials, for example, “EX” for Excavator.
| 8EX120 | 120 Excavator |
| 8EX150 | 150 Excavator |
| 8EX200 | 200 Excavator |
Note:
HeavyBid sees each number as individual characters, and not as a whole number. For example, the following resources would order in this fashion:
8EX100
8EX1000
8EX150
8EX200
8EX90
Explanation:
- Even though 8EX1000 is the largest number in this set, it's sorted after 8EX100 because the first 4 characters are the same, and the 5th character in 8EX1000 is lower than the 5th character in 8EX150.
- 8EX90 is the last number in the set, because the 4th character (9) is higher than all other 4th characters (all 1). To "properly" sort 8EX90 to show up before 8EX100, the resource must be re-coded to 8EX090.
Understanding Local vs. System Data:
Local data is data that is specific to the estimate currently open. This primarily means the makeup of the estimate, including biditems, activities, resources, and quotes. Information in these menus will change depending on the current estimate that is open.
System-wide data is a single copy of data that is the same independent of which estimate is currently open. This includes some HeavyBid administration, such as the lists of users and estimates, as well as codebooks and some other setups.
The Setup menu has a footer for each group, indicating whether the data is Estimate (Local) or System-Wide:

Setups Including Costs (Estimate):
As a rule of thumb, it is good to understand that costs are kept in the estimate level. This enables HeavyBid to be used to work on estimates in different regions that may have different labor rules and/or different material prices. This also preserves old estimate costs which can be opened and referenced at a later date. Some of these will be covered in more detail below.
Codebooks (System):
Codebooks are the fuel for all of the powerful automation features in HeavyBid. Standardized codes are required to build estimates automatically, export to accounting easily, or perform detailed analysis. For instance, if “4FENCE” is determined be the code standard always used for fencing subs, HeavyBid can automatically add a Fence quote folder every time this code is used, and an accounting code can be set up for an easier export to accounting. Here are some common shortcuts from codebooks:
- Biditem Codebook – Each biditem can be setup to automatically bring in a description, units, and specific activities and resources.
- Activity Codebook – Activities can be assigned typical crews and production rates, a special Workers Comp code, and alternate codes for exporting to accounting and HeavyJob.
- Material Codebook – For each type of resource, an accounting code, a scheduling code, and a quote folder can be designated for automation purposes.
The primary purpose of codebooks is to build a menu of standard codes to be used in every estimate and by every estimator. With this goal in mind, codebooks must be systemwide.
Labor, Equipment, and Crews (Estimate):
With HeavyBid, many companies bid across multiple states and many different types of work. Even within a single company, different bids can have very different setups for their labor, equipment, and crews.
HeavyBid allows for this through master estimates. Master estimates can be established for each state, which allows for different sets of labor rates, taxes and fringes, overtime rules, etc. Master estimates can also be designated for each type of work, which allows for different crew makeups and sets of labor and equipment.
Materials (Both, but Mostly System):
At the system level, materials can be setup in the Material Codebook. This gives the advantages of standardized codes, as noted above. HCSS recommends filling the Material Codebook with every material the company may need. This can be done by importing lists from accounting system, excel, or from a favored material vendor.
When materials from the Material Codebook are used in an estimate, HeavyBid will automatically fill the local data. This allows an estimate to maintain a much smaller list of materials for the current estimate, and streamlines the process of making changes to plug prices.
IMPORTANT! When adding a material code to an activity within an estimate, if the material code exists in both the system-wide codebook and in local material, HeavyBid will use the default values from the material code found in Local Material.
Other System Data:
- Vendor/Business Contacts (ADV+) – Vendors used across multiple estimates, where their information (Address, Name, Contacts, etc.) remain relatively unchanged, can be set up in System Data.
- User Administration (Multi-User) – Groups and User accounts that allow for user management, security, and restrictions to certain aspects of the software.
- Quote Folders Relationships (ADV+) – HeavyBid can automate quote folder creation and automatically pull in materials and vendors into the different folders with properly established relationships.
- Estimate Filters (ADV+) – Filters enable ease of navigating the Open Estimate list by assigning different filters to estimates, such as Year, Region, State, etc.
A master estimate is used as a template for creating new estimates. A new working estimate is usually a copy of a master estimate with a new estimate code and name. Any changes made to a new estimate will have no effect on the Master Estimate that was used as a source. The master estimate contains common estimate information such as:
- Labor
- Equipment
- Crews
- Calendars
- Overtime rules
- Workers compensation
Rarely will biditems and activities be set up in a master estimate. If there are biditems and activities present, they are usually indirect costs that are common to most jobs.
While a HeavyBid system can have several master estimates, only one master can be used at a time as the default source estimate. The most common reason for having more than one master estimate is if the company does work in different states (or counties) and each has different labor and/or equipment rates.
Example: If performing work in New York and New Jersey and the labor rates are different for each state, there can be a master estimate set up with the New York labor rates and another master estimate set up with the New Jersey labor rates.
Open Estimate Screen:
Working and Master Estimates are separated in the Open Estimates screen. To access this screen, navigate to File > Open.
Working Estimates List:
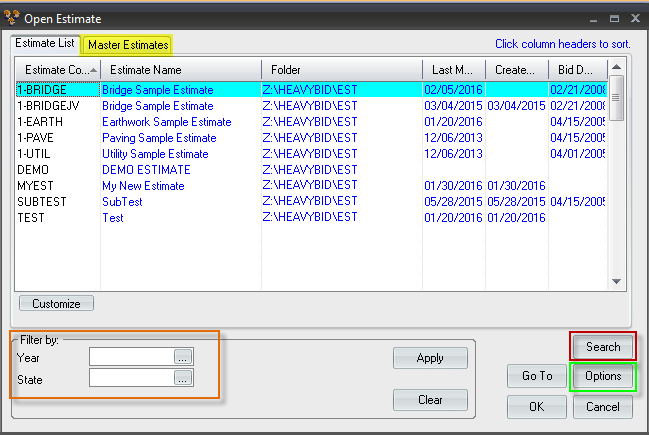
- By default, all working estimates are listed.
- This list can be filtered to only see estimates meeting specific criteria.
- To find an estimate by code, simply start typing the estimate code on and hit enter.
- To find an estimate by name, click on the Search button and input part of the Estimate Name.
- To view Master Estimates, click the Master Estimates tab on top of the screen (yellow highlight).
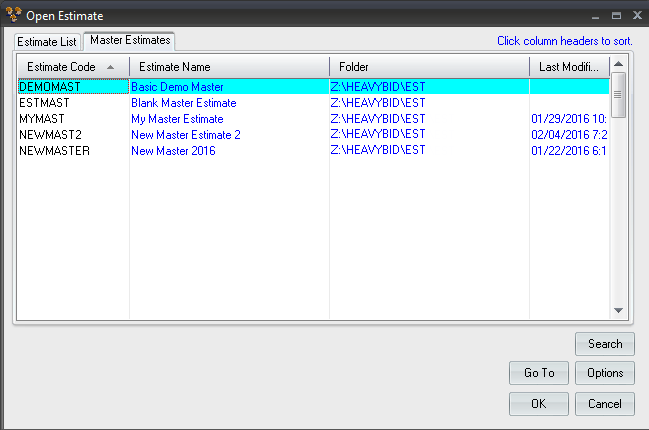
Master Estimates List:
- Unless otherwise specified, newly created estimates will be normal working estimates by default. To designate an estimate as a master:
- Click on an estimate within the Estimate List to highlight the row.
- Click Options.
- Select the check box beside Master.
- Click OK.
Prior to moving forward with this tutorial, please perform the following to ensure all files and setups are present:
- Launch HeavyBid.
- Navigate to Menu > File > Open.
- Click on the Master Estimates tab.
- Ensure DEMOMAST is listed as an available master estimate.
- If this estimate is present, Proceed to HeavyBid Tutorial: Estimate Setup.
- If this estimate is missing, proceed to step 7.
- Navigate to Menu > File > New > New Estimate from Backup.
- Within the Source Backup section, click Browse and navigate to [HeavyBidShareDrive]:\UTILITY\Default.
- Select DEMOMAST.est and click Open.
- Select the check box beside Display this estimate with Master Estimates.
- Click Next,
- Click Finish.

