Table of Contents:
- Navigate to Menu > File > New > New Estimate.
- Populate Estimate Code with any code which will easily distinguish this estimate as a tutorial estimate.
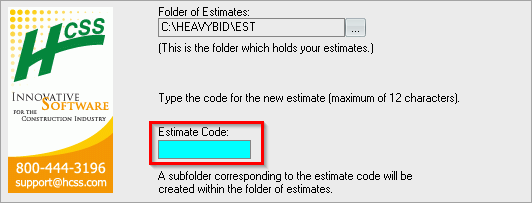
- Click Next.
- Populate Estimate Name as desired.

- Click Next.
- Click the 3 dot ellipsis within Source Estimate (not Browse).
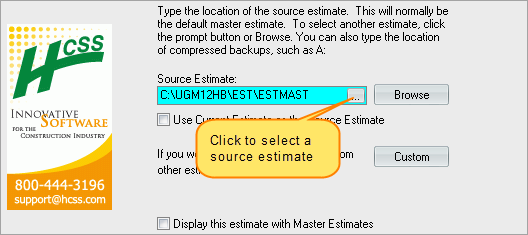
- Click DEMOMAST to select the Basic Demo Master.
- Click OK.

- The Source Estimate field should now show the DEMOMAST estimate.
- Information from the source estimate will be copied into the new estimate. Usually, the source estimate is a master estimate containing common resource codes and costs for labor, materials, equipment, crews, etc.
- Click Finish.
Tip: HCSS recommends setting up a different master estimate for each state/type of work commonly performed.
Add a Labor Code:
- On the menu bar, click Setup > Labor.
- In the first row of the grid, in the Labor column, type L.
- Press Tab to move to the next cell in the grid.
- In the Description column, type Laborer.
- In the Rate column, enter 10.
- This sets the base cost for this labor craft to $10.00.
- Notice that MH is automatically entered in the Unit column.
- MH (man-hours) is the default unit for all labor crafts.
- Click the Tax % column header.
- In the taxes window, enter the following tax rates:
- FICA - 2.25
- FUI - 3.50
- SUI - 3.15
- 401K - 3.10
- These tax rates will be applied for this labor craft throughout the estimate. Setting this up within the set up labor window allows for different tax rates for different types of labor.
- Click OK.
- Notice that a cumulative tax rate of 12.00 is shown in the Tax % column.
- Click the Fringe $ column header.
- In the fringes window, enter the following fringe costs:
- DB - 0.800
- HEALTH INS - 0.700
- VACATION - 0.000
- Fringes are based on $/unit. If labor is left at a unit of MH, this becomes $/man-hour.
- Click OK.
- Notice that a cumulative fringe cost of 1.500 is shown in the Fringe $ column.
- Arrow down or tab through to the next row in the grid.

Add Another Labor Code:
Enter the following information in the second row of the grid:
- Labor - O
- Description - General Operator
- Rate - 12.00
Notice the red stop sign in the top left corner of the window, and near the Last Change area on the far right side of the toolbar. The stop sign indicates that changes exist that have not been saved.
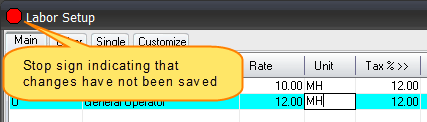
Changes can be saved by moving to a different row in the grid, by clicking the save icon in the toolbar, or by pressing F2.
Set Up Additional Labor Codes:
For the purpose of this tutorial, add the following labor codes:
| Labor | Description | Rate |
|---|
| OB | Backhoe Operator | 14.00 |
| OE | Excavator Operator | 16.00 |
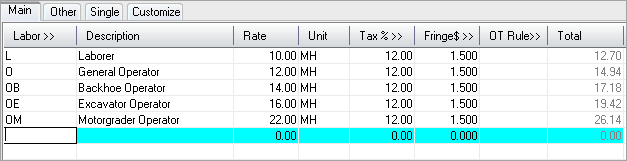
| OM | Motorgrader Operator | 22.00 |
The completed screen should look like this:
Calendars:
Calendars are assigned on an activity level and applied to all labor resources within that activity. Use the calendar to set the amount of hours worked during a workweek and the hours/shift for production.
Calendars are set up in a Master Estimate, and shouldn’t change too much over a long period of time, unless new shifts are introduced.
Calendars are used to determine:
- Shift length
- Hours worked in a day
- Productive and unproductive hours
- Production rate of a crew
Overtime Rules:
Overtime Rules are used in combination with Calendars to calculate if overtime factors apply. Overtime factors are used to calculate a Premium % used to calculate the total cost of labor resources. Specific overtime rules can also be set up for salaried employees to ensure that their calculated hours are not subject to an OT Factor.
Overtime Rules are used to determine:
- Overtime Factors
- Hours worked before Overtime Factors kick in
- Designate Salary Employees
- OT Premium %
TIP: Set up Overtime Rules in a master estimate (an estimate containing setup resources used consistently throughout all estimates) so they will be copied to a new estimate during the New Estimate process. If you do not set up Overtime Rules in the master estimate, you will need to set them up each time you start a new estimate.
OT Premium %:
OT Premium % derives from the amount of hours worked vs. the amount of hours paid. If working straight time (no overtime), the premium % will always be 100%, since the amount of hours worked and amount of hours paid is the same. The calculation used is amount of Hours Paid / Hours Worked on a weekly level.
The most common overtime rule is a factor of 1.5 of any hours worked over 40 hours a week. On a daily level that equals to any time worked over 8 hours in a 5 day workweek.
50 Hour Workweek:
- 50 hours worked would imply 10 hours of overtime (OT) in a 40 hour workweek.
- Those 10 OT Hours are multiplied by the OT factor of 1.5 = 15 Hours
- 40 hours straight time + 15 hours OT factor = 55 hours paid
- 55 hours paid / 50 hours worked = 110% Premium %
- Each hour worked would apply to OT Premium % of 110% to calculate the OT impact on every hour worked.
Salaried Employee:
A salaried foreman has an hourly rate but gets the same pay no matter how long he works. To set up a salaried foreman, select the Salaried Employee check box, then enter the number of hours/day to use for the hourly rate calculation.
Complex Rules:
Different OT Factors can be set up based on the amount of hours worked. For example, OT Rule 1 to start at 8 hours, OT Rule 2 at 10 hours, and OT Rule 3 at 12 hours, each factoring the amount of hours worked by a different multiplier.
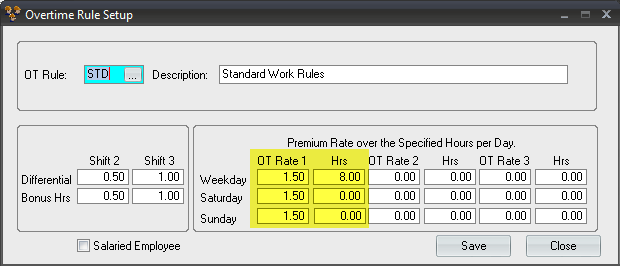
- Navigate to Menu > Setup > More (estimate group) > Overtime Rules.
- For OT Rule, enter STD for and input Standard Work Rules as the description.
- In the OT Rate 1 column, enter 1.5 for Weekday, Saturday and Sunday.
- This is the number time will be factored by. 1.5 indicates that when this rule is applied labor will get paid time and a half for hours worked over the designated threshold for OT Rate 1.
- In the Hrs column directly to the right of OT Rate 1, for Weekday enter 8.00.
- This means that a factor of 1.5 will be applied to any time beyond 8 hours on weekdays.
- In the Hrs column for Saturday and Sunday, enter 0.00.
- This means a factor of 1.5 will be applied to any time worked beyond 0 hours on weekends.
- Navigate to Setup > More (estimate group) > Calendars.
- Enter 405 in the Calendar field.
- The calendar code is the unique identifier for a work week calendar. It is a three-character field that can be any combination of numbers or letters. HeavyBid uses this code to sort work week calendars.
- Enter "5 Days – 40 Hours" in the Description field.
- The description is limited to 28 characters, so abbreviate when necessary. A good description might be the number of hours in the work week.
- Enter 8.00 in Hours/Shift for Production.
- This is the number of hours for production worked in a single shift, and is used in productivity calculations when using crews. This is not used in overtime calculations.
- Enter 8.00 for Shift 1 for each workday (Monday – Friday).
- If no hours are worked on the weekend or during a second or third shift, leave those fields blank. It is typical to only fill in one shift per work week calendar.
- Click Save.
Setting Up a Piece of Equipment:
- Navigate to Menu > Setup > Equipment.
- In the Equipment column, enter 8BH.
- This will be the equipment code for a backhoe.
- In the Description column, enter Backhoe.
- HR (hours) is automatically entered in the Unit column.
- HR is the normal unit used for all equipment in the estimate.
- In the Type column, select Inside.
- Inside indicates a piece of equipment that is owned. Outside indicates an outside rental, a piece of equipment that is rented from another company. These may be abbreviated I and O to save space on some screens.
- Leave the Operator column blank.
- The Operator column can be used to assign a labor code to a piece of equipment. Then, when the equipment is used in a crew or activity, the operator can be automatically added as well.
- In the Rent Rate column, enter 19.75.
- This is the hourly rate charged for using the equipment.
- In the EOE Rate column, enter 18.05.
- This is the hourly operating cost for the equipment, and can include amounts for fuel, oil, maintenance, and other costs.
- Press Enter to move to the next row of the grid.
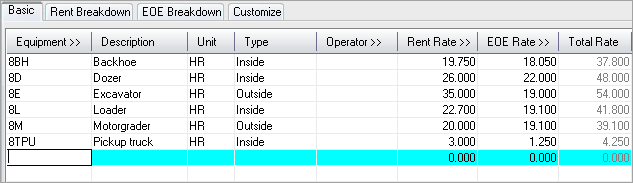
Set Up Additional Equipment:
For the purpose of this tutorial, add the following equipment codes:
| Equipment | Description | Type | Rent Rate | Fuel Rate |
|---|
| 8D | Dozer | I | 26.00 | 22.00 |
| 8E | Excavator | O | 35.00 | 19.00 |
| 8L | Loader | I | 22.70 | 19.10 |
| 8M | Motorgrader | O | 20.00 | 19.10 |
| 8TPU | Pickup Truck | I | 3.00 | 1.25 |
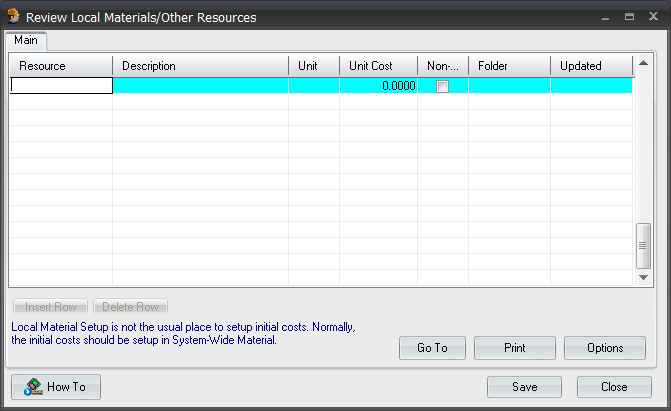
The Review Local Materials/Other Resources window can be opened from the menu bar by clicking Setup > Local Materials/Subs.
While material codes can be set up by entering them here, materials should be added to the estimate as needed from within Estimate Entry.
The crew feature is one of the most powerful in HeavyBid. A crew consists of labor and equipment resources. Later, when a crew is added to an estimate, HeavyBid automatically brings all of its associated labor and equipment into the designated activity.
This means that crews enable reuse—rather than rebuild—for common work items. For example, if the same laborers and equipment are always used when doing drainage work, a great deal of time can be saved by setting up a Drainage Crew in the master estimate and using it every time that type of work is performed.
Setting Up A Crew:
- Navigate to Menu > Setup > Crews.
- In the Crew field, type BH.
- In the Description field, type Backhoe Crew.
- Click in the first row of the grid.
- Notice that moving from the fields at the top of the window to the grid automatically saves the new crew.
- Click the Resource column header.
- The Select Resources window opens. The tree on the left side of the window lists all the labor and equipment set up within the current estimate.
- Within the Equipment section in the tree, locate and select the check box for the 8BH Backhoe.
- Within the Labor section in the tree, locate and select the check boxes for OB - Backhoe Operator and L - Laborer.
- Notice the selected resources will display in the grid to the right of the selection tree.
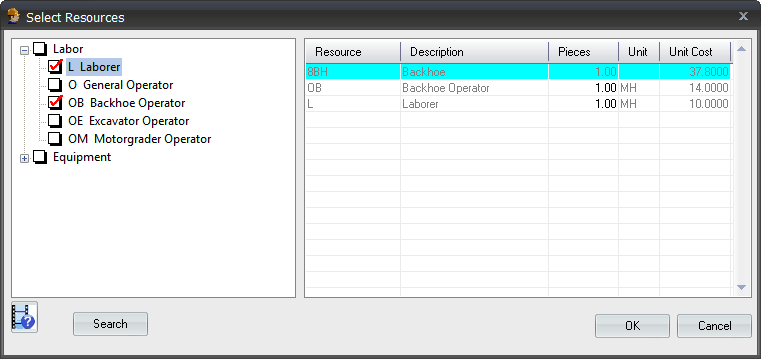
- Click OK.
- The completed crew should look like this:

Add Additional Crews:
For the purpose of this tutorial, add the following equipment codes:
| Crew Code | Description | Resources |
|---|
| BLADE | Blade Crew |
- 8M - Motorgrader
- OM - Motorgrader Operator
|
| CLEAR | Clearing Crew |
- 8D - Dozer
- 8E - Excavator
- 8TPU - Pickup Truck
- L - Laborer
- O - General Operator
- OE - Excavator Operator
|
| LOAD | Track Loader Crew |
- 8L - Loader
- O - General Operator
|
Setting Up a Biditem:
Biditems represent the owner’s items that are being priced and included in an estimate. This section will detail how to set up biditems in order to get the estimate ready for the addition of cost.
- Navigate to Menu > Setup > Biditems.
- In the first row of the grid, enter 10 in the Biditem column.
- The biditem code is a unique identifier for this biditem. Typically, biditems are numbered by tens, starting either at 10 or 100. This leaves room between biditems to add other items later, such as headings or additional biditems for a change order. A biditem cannot be added between immediately consecutive biditems and decimals are not allowed. For example, if biditems were created using codes 1 and 2, a biditem cannot be added between them.
- In the Description column, enter Clear and Grub.
- In the Type column, enter D.
- D indicates that this is a “direct” biditem. Direct biditems hold costs that will be shown directly on the bid proposal. Refer to the online help (press F1 from any window) for information about the other biditem types, such as indirects and holding accounts.
- In the Bid Quan column, enter 40.00.
- The bid quantity is the number of units of this work that the owner expects to pay for
- In the Unit column, enter ACRE.
- There are no standard units for biditems (as there were for labor and equipment resources), but units should be entered consistently throughout the estimate. If ACRE is entered here, but ACR or AC elsewhere, they will not be recognized as the same unit.
- Move to the next row to save the biditem.
Add Additional Biditems:
| Biditem | Description | Bid Quan | Unit |
|---|
| 20 | Remove Old Concrete | 2,300.00 | SY |
| 30 | Blade (Erosion Control) | 86.00 | HR |
| 40 | Furnish and Place Topsoil | 8,678.00 | SY |
| 50 | Straw and Hay Mulch | 86,098.00 | SY |
| 60 | Straw and Hay Mulch Seed | 2,300.00 | SY |

Tip: If the owner has specific biditem numbers that are unorganized or difficult to estimate with, biditems can be set up with preferred numbers and the owners numbers can be entered in the Client# column. The client bid item numbers can then be printed on the bid proposal instead of the HeavyBid biditem numbers.

